 PixelVibing
How to Make a Seamless Pixel Art Tileset with AI (Autotile Terrain in Minutes)
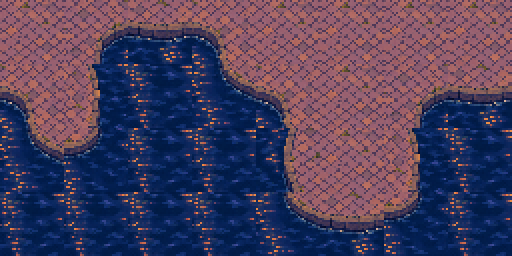
Ground tiles are the most repetitive art in a 2D game, and the easiest to get wrong. A grass tile is simple. The transition from grass to sand, in every corner and edge combination, is where hand-drawn tilesets eat whole weekends.
This tutorial shows how to make a seamless pixel art tileset with AI in PixelVibing: a terrain set of sixteen tiles between two grounds that join in any layout, so you can paint a map freely and never see a seam.
One terrain set, painted into a map: cobblestone quay above, harbour water below, a low stone edge between them.
What a terrain set is
A terrain set describes two grounds and the edge between them:
| Part | Example |
|---|---|
| Lower ground | Harbour water, sand, dirt |
| Upper ground | Cobblestone, grass, snow |
| The edge | A low stone wall, a soft shoreline, a cliff |
PixelVibing draws the sixteen tiles that cover every way those two grounds can meet across a tile's corners. That's the classic "autotile" or Wang-tile layout, so any engine or map editor that paints with corner-based tiles can use it.
Step 1: Choose your two grounds
Open the Terrain page in the Editor. Paint the two grounds on a picture with an upper and a lower brush, or hand them over from your map. Good pairs have a clear contrast:
- Grass and sand
- Water and stone
- Snow and frozen dirt
- Lava and basalt
A reference helps. If you already have a level design or a screenshot you like, take its grounds straight from it: in the Library, a terrain set can be made from a reference's grounds.
Step 2: Shape the edge
This is what separates a good tileset from a generic one. Before anything is paid for, you set and preview the edge:
- How tall the step stands between the grounds: flat, a low ledge, or a tall cliff.
- How far the upper ground spreads over the lower one.
- How ragged the edge is: a clean wall, or an organic, broken shoreline.
Then add a sentence about it, such as "a low mossy stone wall", and generate.
Step 3: Paint your map
The terrain set lands in your Library. In the Editor's map editor, paint with it on a real grid, level by level. Because all sixteen combinations exist, every brush stroke picks the right tile automatically, with no seams and no missing corners.
Place objects on top (see How to make pixel art game assets with AI), then walk a character over it to check the scale.
Step 4: Make it move (water, lava, grass)
Water that ripples and lava that churns make a map feel alive. In the desktop Editor's terrain panel, a terrain set already on the map can be animated as a loop: describe the motion in words, and the ground that shouldn't move stays exactly as it was.
Step 5: Export it
Export your map and its tiles for PixiJS, Phaser or Godot:
pixel-vibing-cli export godot
Tileset tips
- One terrain set per pair of grounds. A beach is sand-water; the dunes behind it are a second set, sand-grass.
- Keep the scale in the style guide. Your tile size lives there, so every set matches every other.
- Contrast matters more than detail. Two grounds of similar colour make the edge hard to read in-game.
- Start from a level design. Generate a whole scene first, then take its terrain and objects out of it, and everything already belongs together.
FAQ
Are the tiles really seamless? Yes. The sixteen tiles are drawn to join in any layout, on the true pixel grid.
Which engines can use it? It is a corner-based (Wang) set, and the export writes sheets for PixiJS, Phaser and Godot, or a simple default format any engine can read.
Do I need to draw anything? No. Painting the two grounds is a rough selection, not drawing.
Next: stop placing tiles by hand. Read Vibe-code a game with Claude Code, and let AI make all the pixel art.