 PixelVibing
How to Edit AI Pixel Art: Generate from References, Fine-Tune Every Pixel, Paint Your Map
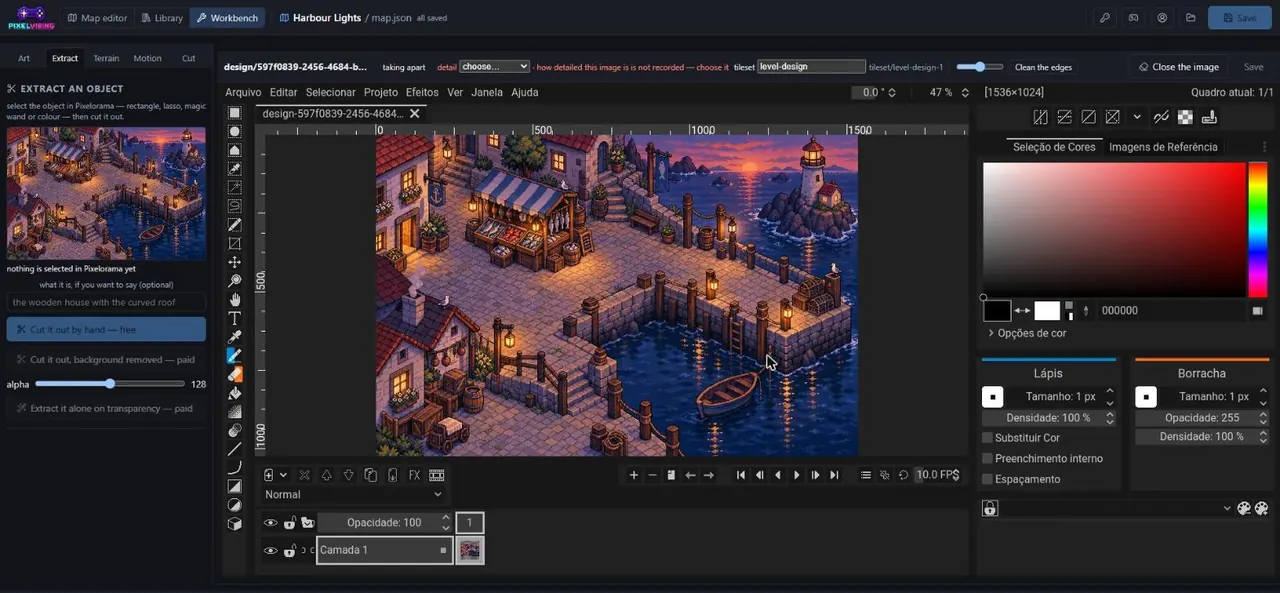
AI gets you 90% of the way. The last 10%, a sword that should be shorter, a palette that's slightly off, a map that needs a path here, is what makes art feel like your game.
The PixelVibing Editor is the art toolkit for that last 10%. It opens on the same project your coding assistant works in, generates from your own references, and lets you fine-tune anything, pixel by pixel. This tutorial walks through its four parts.
Opening the Editor
The Editor runs on Windows, macOS and Linux, and in your browser from the web app. From your game's folder, one command opens it on your project:
cd my-game
pixel-vibing-cli editor
1. Generate from references
Words and up to three reference images become an object, a creature or a level design, drawn in the style of the rest of your game. A reference can be:
- a screenshot of a game whose look you love,
- a photo (your dog, your street, a lamp in a shop window),
- a rough sketch on paper or in any paint app.
The reference steers what is drawn; your style guide keeps how it's drawn consistent.
2. The Library: take a scene apart
The Library holds every reference, level design, object, creature and terrain set in your project. Two moves make it powerful:
- Take objects out of a reference. Generate a whole scene (a level design), then pull the market stall, the lamp post or the boat out of it as separate assets.
- Make terrain from its grounds. Turn the cobblestones and the water in that same scene into a seamless terrain set. See How to make a seamless pixel art tileset with AI.
From the Library you can also edit an asset with words ("make the roof blue", "give him a red scarf") or make a variant of an object, and the change is drawn on the asset's own pixel grid, leaving the rest alone.
3. The Workbench: fine-tune every pixel
The Workbench is a full pixel editor for any asset:
- Its pixels: pencil, fill, selection, layers.
- Its palette: recolour a whole sprite at once.
- Its eight views: fix one facing without touching the others.
- Its animation frames: adjust a single frame of a walk cycle.
Typical fixes take seconds: removing a stray highlight, shortening a weapon, making a character's eyes read better at small sizes.
4. The map editor: paint a level
Paint terrain and place objects on a real tile grid, level by level. Terrain sets join automatically as you paint, objects sit on their footprint, and then you can walk a character over the map to check scale and pacing before a line of game code exists.
A quick workflow, start to finish
| Step | Do this |
|---|---|
| 1 | Drop in a screenshot of a scene you like and generate a level design from it |
| 2 | Take its objects out, and make a terrain set from its grounds |
| 3 | Fix anything in the Workbench: a colour, a pixel, a frame |
| 4 | Paint a map with the terrain, place the objects, walk a character around |
Then export it all for PixiJS, Phaser or Godot with pixel-vibing-cli export.
FAQ
Do I have to use the Editor? No. Your coding assistant can make every asset on its own; the Editor is there when you want control.
Does editing by hand change my style guide? No. The guide changes only when you or your assistant edit it.
Are my files safe? Your project lives on the platform, so it is the same in the web app, the Editor and the command line.
Start here: new to PixelVibing? Begin with How to make pixel art game assets with AI, or start free with free credits.